Información General Información General |
| Artículos |
| Notícias |
| Enlaces |
| Contactar |
| Buscar |
| Premio Nadal |
| Formación Continuada |
 |


Immediate Post-Extraction Implants with Aesthetic Restoration |
||||||||||||||||||||||||||||||||||||||||||||||||||||||||||||||||||||||||||||||||||||||||||||||||||||||||||||||||||||||||||||||||||||||
Publicado el: 08/04/2008 10:33:44  | ||||||||||||||||||||||||||||||||||||||||||||||||||||||||||||||||||||||||||||||||||||||||||||||||||||||||||||||||||||||||||||||||||||||
IMMEDIATE POST-EXTRACTION IMPLANTS WITH AESTHETIC RESTORATION José Manuel Navajas Rodríguez de Mondelo Full Professor of the Department of Stomatology, University of Granada Rosa Mª Pulgar Encinas Associate Professor of the Department of Stomatology, University of Granada José Manuel Navajas Nieto Dentist, Master in Implantology, Madrid Complutense University; Master in Oral Surgery, University of Granada Cristina Lucena Martín Associate Professor of the Department of Stomatology, University of Granada Cristina Navajas Nieto Dentist, "Expert" in Periodontics, University of Granada Correspondence: Dr. José M. Navajas Rodríguez de Mondelo Abstract: This study addresses the present state of knowledge on immediate implantation in fresh extraction socket. The author's selection of the single-piece Q Trinon R implant is explained, reporting clinical cases with a follow-up of around 5 yrs. Key Words: Immediate post-extraction implants. Immediate post-extraction aesthetics. Q Trinon implants INTRODUCTION Placement of an endosseous implant is the current treatment of choice for the prosthetic replacement of missing teeth, regardless of the cause of their loss.i ii Conventional recommended reposition protocols include an initial stage to achieve osseointegration and a second prosthetic stage for tooth replacement. This treatment sequence requires a waiting time that is functionally solved with a removable prosthesis, causing discomfort to the patient or with a temporary bonded crown, increasing the cost. Scientific evidence has demonstrated that immediate implant loading is a valid procedure with predictable success when indicated by the anatomo-functional conditions.[3],[4] [5] Implants have been placed in oral sockets immediately after extraction since the very beginnings of implantology. Although the two-stage protocol has traditionally been recommended, clinicians are now performing the immediate loading and aesthetics of the immediate socket mplant in response to the aesthetic demands of their patients.[6],[7] [8] [9] [10] [11] [12] In this article, authors propose a variant of the conventional technique and present the outcomes obtained using this approach in clinical cases with 5 yrs of follow-up. Indications and contraindications Immediate socket implantation is indicated for anterior tooth losses due to accidental trauma or coronary or root fractures in endodontic teeth without active infectious disease. It is also indicated in cases of dentine cement or internal dentine resorption and advanced periodontal disease provided that there is adequate remnant bone for implant stabilization and aesthetic restoration is essential. Contraindications are:
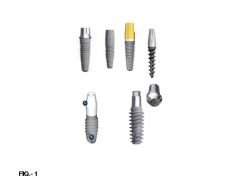
They are generally placed in the incisor-canine region and premolar group. Implant selection All types of commercially available implant have been used in immediate implantation. Two-piece implants (implant + transepithelial abutment) are generally used in two stages: a) Immediate implantation in fresh socket b) Prosthetic replacement and implant loading at least 6-8 weeks later. More recently, these implants have also been fitted with a temporary crown, but this procedure is complicated and requires impressions to be taken during surgery, the selection and placement of an abutment, manufacture of the crown and its cementation at least 24 h after implantation. For this reason, the implant of choice in cases requiring immediate prosthetic replacement will undoubtedly be the one-piece implant, which incorporates both abutment and implant, allowing a temporary crown to be placed in the same surgical act without difficulty. The main advantages are:
This type of implant also has some drawbacks:
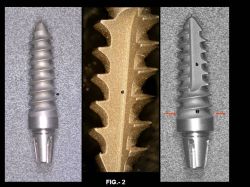
Nobel BiocareR: Nobel Direct, Posterior Nobel Direct and Active Nobel Our group uses the TrinonR Q implant[13] (Fig. 2) for this procedure This one-piece implant has a conical design with a wide spiral of blunt edges and a threaded part for self-screwing and condensation of bone between spirals. The apex has a blunt point to facilitate insertion. It has a 2-4-mm long polished neck and conical abutment with 8º convergence that bears four slots for insertion and to avoid crown rotation when only one tooth is replaced. As demonstrated by Shi et al.,[14] the conical design of the implant, which simulates a natural tooth root, provides a more homogeneous distribution of axial and tangent forces, reducing stress at the bone-implant interface.
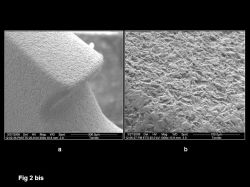
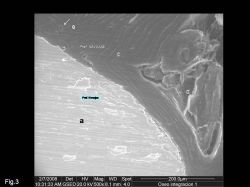
The surface is acid-etched and sand-blasted with aluminium-oxide (Fig. 2bis). It is manufactured in commercially pure titanium (alloy of titanium, aluminium and vanadium). It is available in three diameters at neck level (3.5 mm, 4.5 mm and 5.5 mm) and in lengths of 8, 10, 12, 14 and 16 mm. The implant is first inserted by hand or with a drill at very low speed. A manual wrench is used to control, with one-eighth of a turn, insertion of the implant and condensation of the surrounding bone, allowing intraoperative modification of the insertion axis to achieve the optimal position and desired aesthetic outcome. Because of its design, it can be used as an osteotome, allowing the 3.5-mm width implant to be placed in very thin crests with no need for further surgery and achieving exceptional primary stability. Insertion surgery requires the use of only two conical burs for the 3.5 mm implant and three for the 4.5 mm one. The conical design of the surgical socket and its small size offers important bone saving, minimizing stress and cutting temperature. As in all titanium implants, osseointegration occurs. Given its high primary stability, a large amount of laminar bone is observed in close union with the treated surface of the implant (Fig. 3)
Conditions of extraction previous to immediate implant The success of immediate implantation in fresh socket and the achievement of favourable aesthetics are largely based on two essential conditions: alveolar bone integrity and absence of infection. The extraction procedure must therefore meet a series of requirements to have a minimal traumatic effect on the receptor tissue and ensure an optimal functional and aesthetic outcome. To this end, it is recommended that:
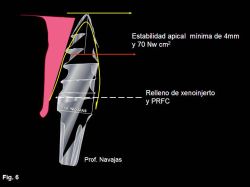
Implant insertion technique There must be at least 3-4 mm of bone in the apical area of the fresh socket for the implant to be adequately secured. Larger apical areas for fixation are more favourable, since they provide greater primary stability. For this reason, manufacturers supply professionals with 16-mm and even 18-mm implants. After the extraction, and taking great care not to damage the alveolar bone crest or papillary area, a meticulous curettage of the whole socket is performed to remove any possible remnants of granulation tissue. It is recommended to produce a small haemorrhage to favour wound-healing.
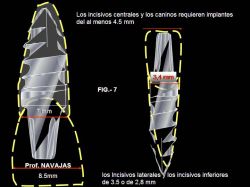
The implant must be fixed with an insertion force of ≥ 60 Newton/cm2 (Fig. 6). The selection of implant size is determined by the characteristics of the extracted tooth. In general, 4.5-mm implants are used for central incisors and canines, whereas 3.5-mm implants are more commonly used for lower incisors and upper lateral incisors (Fig. 7).
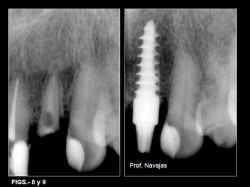
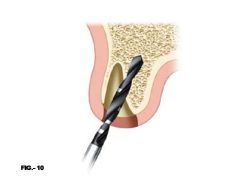
Implant length is conditioned by the need for stabilization, which requires, as mentioned, at least 4 mm of bone to be available between the apical area of the socket and the anatomic limits (Figs 8 and 9). Implants of 3.5-mm require a greater length to be stable than do those with a larger diameter. The placement procedure commences with perforation of the socket floor cortex using a pilot drill, initiating the preparation of the implant bed, which must be at the centre of the socket, as equidistant as possible from its distal and mesial walls. Given the high conicity of the implant design, it is not usually necessary to utilise the palatal wall for support, as recommended for cylindrical implants.
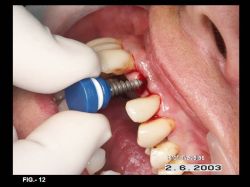
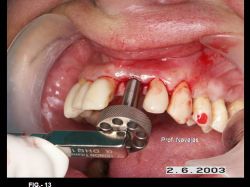
The direction of the implant bed can be modified when aesthetically or anatomically required (Fig.10). Internal irrigation burs of suitable size for the selected implant are then used. The implant, which has a considerable self-screwing capacity, is first inserted manually, with the possibility of correcting its position if necessary (Fig.12). When more force is needed, we use the insertion wrench, especially designed to allow atraumatic fixing of the implant body (Fig. 13).
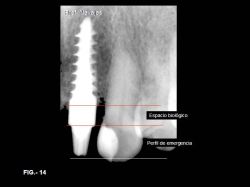
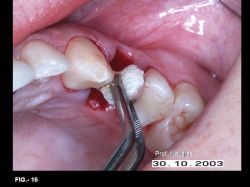
The implant is inserted in the socket until its unpolished part is completely covered by bone. The polished part is in contact with soft tissue and, together with the temporary crown, will contribute to achieving a correct biological space, a good emergency profile and a good aesthetic outcome (Fig. 14). Because of the conical shape of the implant, the free gap between implant and socket is minimal. It has been demonstrated that this space does not need to be filled because. thanks to the high wound-healing capacity of the socket, it will be closed with bone. However, if there is a large gap, a xenograft can be placed with plasma rich in growth factors and fibrin clot. This technique is especially useful in cases of immediate implants in the premolar area where, if there are two sockets, it can enhance wound-healing[15]. When the implant is moistened in plasma rich in growth factors, it is endowed with an active surface that facilitates bone integration (Figs. 15 and 16).
Manufacture of temporary crown The temporary crown has a highly important role in the success of this type of treatment for the following reasons:
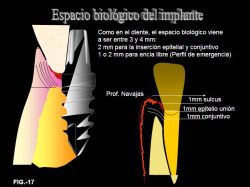
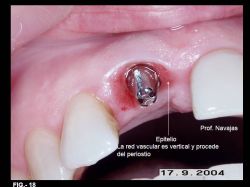
The relationship between inserted implant and soft tissue is similar to that between tooth and periodontium. Thus, bone tissue integrates with the treated (rough) area of the implant and conjunctive tissue adapts to the polished area and a small portion of epithelial insertion, while the remaining gingiva is shaped to the artificial crown that we place for creating an adequate emergency profile (Fig. 17). The two differences with natural teeth are: a) conjunctive tissue fibres are bound to the crestal bone and b) vessels that irrigate the internal part of the emergency profile are vertically aligned, since they come from the periosteum, whereas they form a circular plexus in natural teeth (Figs. 18 and 19). Tarnow et al[16] reported bone remodelling with losses of 1.5-2 mm under the shoulder after abutment insertion in two-piece implants, with a loss of approximately 1.3 mm of bone in crateriform shape. Grunder et al[17] concluded that at least 2 mm of bone (measured laterally) are required to support the gingival profile. The absence of a gap between implant and abutment in Q TrinonR implants hinders bacterial colonization. The other reason that these implants do not generally produce bone loss is that the concavity of the first spiral appears after the polished area, avoiding stress to the alveolar crestal bone (Fig. 2 and 2 bis).
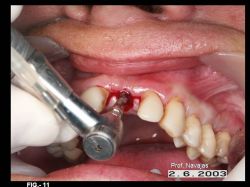
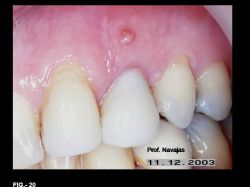
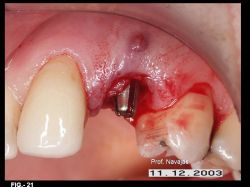
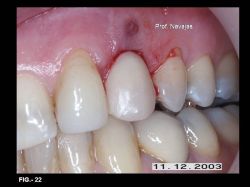
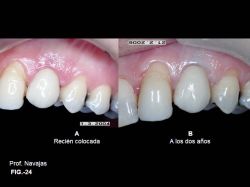
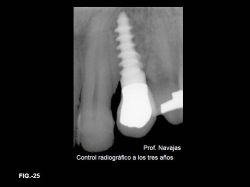
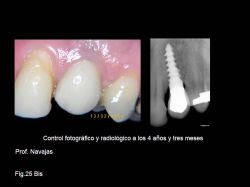
With two-piece implants (implant with abutment), the aim is to avoid bone loss by eliminating abutment micromobility, reducing the gap or using an abutment with a diameter smaller than the implant platform[18]. Temporary crown adaptation procedure Before extraction, alginate impressions are taken from the patient. The prosthetist cuts the tooth to be extracted from the model obtained, forming a slightly over-sized hollow acrylic crown with the colour and aesthetic characteristics indicated by the dentist. The more polished and aesthetic the temporary crown, the better is the outcome. This crown is adapted to the implant abutment using plastic materials for temporary bridges and crowns, followed by the removal of excess material. After the material is cured, it is carefully polished with composite-polishing discs and wheels. For this purpose, it is very useful to place the crown on a replica of the implant. The degree of polish obtained determines the success of soft tissue healing and achievement of an emergency profile (see Fig 18.) After 8 weeks, an impression of the implant abutment is taken and the final crown is made. CLINICAL CASES Case nº 1 A 53-yr-old woman came to the clinic with a root fracture of 23 and active fistula at 2 mm above the gingival margin. Clinical examination demonstrated crown mobility and normality of gingival sulcus. X-ray revealed a well-sealed root treatment and a conical post in the shape of a screw that does not surpass the coronal third of the root. A horizontal fracture was observed at the end of the post. Diagnosis: Horizontal root fracture with no apical infection (Fig. 20). Treatment plan: Extraction and immediate prosthetic replacement with implant in fresh socket. Alginate impressions were taken during the examination and the mould was sent to the dental prosthesis laboratory. Two prostheses were made: an acrylic crown of similar colour and shape to the tooth to be extracted, and a partial removable prosthesis. In cases of immediate post-extraction implantation, it is important to have a partial removable prosthesis prepared. This allows aesthetics to be restored if, after the extraction, it is decided that the implantation should be postponed. Crown and root remnants were extracted, taking care not to damage alveolar bone structures (see above-mentioned recommendations). Examination of the socket interior with a blunt instrument ensured vestibular bone integrity. The socket was curetted and a Q TrinonR implant of 4.5 mm width, 14-mm length and 2-mm polished neck was placed, ensuring that the rough part of the implant was completely covered by alveolar bone (Fig. 21). The socket-implant gap was filled with a clot of plasma rich in growth factors. Figures 22, 23, 24 and 25 show the clinical process and outcome, and Figure 25bis depicts the case at almost 5 yrs after treatment.
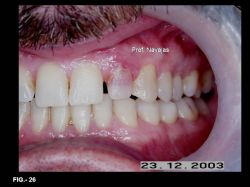
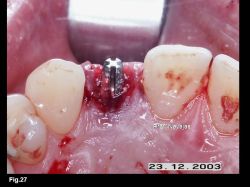
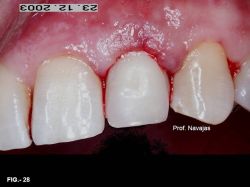
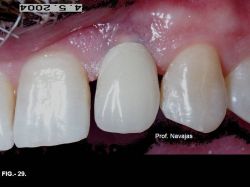
Case nº 2 A 56-yr-old man came to the clinic for mobility in upper left lateral incisor. Clinical history showed a childhood traumatism on the tooth that had been symptom-free in the intervening years. Examination showed the incisor with high mobility to be reddish and to have virtually lost its natural colouring. The X-ray revealed absence of more than two-thirds of the length of the root (Fig.26). Diagnosis: Severe cementum-dentin resorption. Treatment plan: Extraction and immediate implantation. Alginate impressions were immediately taken of both arches and despatched to the dental prosthesis laboratory where, as in the case above, two prostheses were made: a hollow resin crown, and a partial removable crown for immediate aesthetic restoration in case the implantation procedure proved impossible (note the date of the surgery!). Four hours later, extraction and implantation were performed, using plasma rich in growth factors (Fig. 27). Figures 28 and 29 depict the outcome.
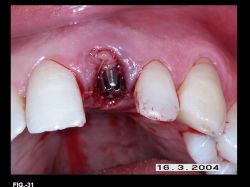
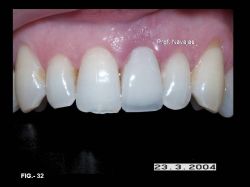
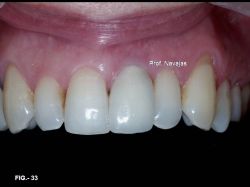
Case nº 3 A 53-yr-old woman came to the clinic for mobility of upper left incisor. Examination revealed a metal ceramic crown on 21, a small periodontal abscess, mobility and mild pain. The X-ray showed a well-performed root treatment, with no periapical lesion and reconstruction with a metal post, with tangential mesial fracture. It was decided to carefully extract the tooth and insert a Q Trinon implant (14 x 4.5 mm) for immediate aesthetic restoration. Figures 31, 32, and 33 illustrate the entire procedure.
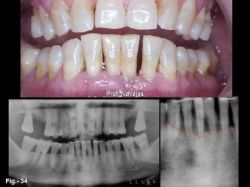
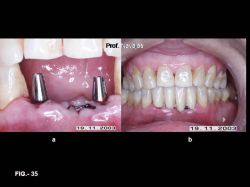
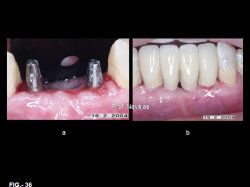
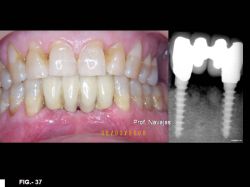
Case nº 4 A 62 yr-old woman came to the clinic for mobility of lower teeth. Based on clinical and X-ray findings, she was diagnosed with adult periodontitis with loss of bone support. Lower incisors were unviable. Figure 34 shows the clinical and radiographic situation of the patient. It was decided to extract the lower incisors and place two immediate implants in 32 and 42 for immediate aesthetic restoration. During the implantation, a Bio-Oss GeistlichnBiomaterials graft was placed in sockets of 31 and 41 to maintain the alveolar crest. Figures 35 and 36 depict the clinical sequence of implantation and prosthetic replacement. Figure 37 shows the outcome after 4 yrs after implanting.
CONCLUSION The use of one-piece Q Trinon implants is a procedure of predictable success for immediate aesthetics restoration after extraction, providing that the indications reported in this paper are followed. [1] Bravi F, Bruschi GB, Ferrini F A 10-year multicenter retrospective clinical study of 1715 implants placed with the edentulous ridge expansion technique. Int J Periodontics Restorative Dent. 2007 Dec;27(6):557-65. |
||||||||||||||||||||||||||||||||||||||||||||||||||||||||||||||||||||||||||||||||||||||||||||||||||||||||||||||||||||||||||||||||||||||
Publicado el: 08/04/2008 10:33:44 |